Monday, November 6, 2017

Soft Wholemeal Loaf


(A)
290g bread flour
5g wheat germ
5g wheat bran
12g coconut sugar
5g sea salt
4g instant dried yeast

(B)

205g water (I used 140g water + 65g Greek yogurt)
15g fresh milk
20g olive oil

  • Combine all ingredients (A) in a mixing bowl and mix well.  Add in (B) followed and knead until dough is smooth and elastic and passed the "window pane test".
  • Place the dough in a lightly greased bowl.  Cover with a damp cloth and let it rise until doubled.
  • Punch down the dough to release trapped air.  Cover and let it rest for 10 minutes.  
  • Divide into 3 portions.  
  • Flatten the dough and roll it up tightly.  Place onto a greased loaf pan (24 x 13 x 7cm).  Repeat with the other 2 portions of dough.  Cover and let it rise until almost doubled (90%).
  • Preheat oven to 190°C.
  • Bake for about 35 - 40 minutes or till golden brown.

Tuesday, October 24, 2017

Coffee-Walnut Cupcakes


Calling all coffee lovers, this is the cake for you! The combination of coffee and walnut is quite delightful and there is no better aroma to fill your home than with coffee in the form of cakes.  This cake is moist, buttery with a soft texture and packed with coffee flavour.  It is deliciously satisfying, especially with a cup of steaming coffee.


[4 Eggs (with shells) weighed 230g]
Ingredients:  Makes 12 cupcakes

(A)
180g unsalted butter, softened at room temperature
45g caster sugar

(B)
4 egg yolks

(C)  Mix together:
150g self-raising flour
20g milk powder
30g almond meal
1/8 tsp sea salt (omit if using salted butter)

(D)
55g espresso coffee

(E)
30g walnut, toasted and chopped
extra whole walnuts, for topping

(E)
4 egg whites, bring to room temperature
45g caster sugar
  • Preheat oven to 170°C.  
  • In a clean, oil-free mixing bowl, beat egg whites using an electric mixer until soft peaks formed.  Gradually beat in sugar until medium peaks formed.  Set aside.
  • Using the same beaters, cream butter and sugar until light and pale in colour.
  • Gradually add in egg yolk, one at a time, beating well after each addition. (Remember to scrape down the sides of the bowl).
  • Add in flour mixture and coffee in 3 additions, starting and ending with flour. Combine until just incorporated.
  • Finally, fold in beaten egg whites in 3 additions, ensuring the batter is well mixed.  Gently fold in chopped walnuts.
  • Divide batter among cupcake cases, filling each case about 3/4 full.  Place a whole walnut on top of the batter.
  • Bake for about 25 mins or until a skewer inserted into the centre of the cake comes out clean.
  • Transfer the cupcakes on a wire rack to cool.


Wednesday, October 11, 2017

No-Bake Mini Strawberry Cheesecake


With fresh strawberries in abundance and relatively cheap I decided to make something out of these big, luscious, sweet strawberries.  After making the Lychee Cheesecake recently, of course Strawberry Cheesecake came to mind.  

This is a no-bake smooth, creamy and refreshing cheesecake where Greek yogurt is added to give a lighter texture and adds more flavour.  Top it with fresh strawberries before serving and it will suit any dinner party.


Crust: 
150g Marie biscuits, or any biscuits of your choice
85g butter, melted

Filling:
250g cream cheese, softened
150g caster sugar
350g strawberries, washed and hulled
6 gelatin sheets
40g lemonade (I used Sprite)
125g thickened cream (chilled)
125g Greek yogurt

  • Process biscuits finely in a food processor.  Add in melted butter and mix to combine.
  • Press biscuits into individual dessert mould and using a glass, firmly press down the crust to compact it.  Refrigerate while preparing the filling.
  • Beat chilled cream and yogurt together until soft peaks form.  Set aside in the fridge.
  • Place gelatin sheets into a bowl of cold water for about 10 minutes to soften them. Meanwhile gently heat up the lemonade. Squeeze out excess water from the gelatin sheets; then add into the warmed lemonade and stir gently until it dissolves.  Set aside.
  • Using a stick blender blend the strawberries to get 250g of strawberry puree.  Then push the puree through a fine sieve.  Add gelatin mixture into the strained puree and blend to combine.
  • Beat softened cream cheese and caster sugar until smooth and creamy.  Gradually add in the strawberry puree and beat to combine.   
  • Lastly fold in whipped cream and yogurt mixture.
  • Spoon the mixture into crusts and cover with plastic wrap.  Chill for at least 4 hours or overnight.  
Note:  If you are using gelatin powder, dissolve  15g gelatin powder in 40g strawberry puree or lemonade.

Monday, October 9, 2017

Homemade Mandarin Pancakes

Peking Duck Pancakes


Mandarin pancakes or Peking Duck Pancakes are traditionally served with slices of duck with thin and crispy skin together with cucumber batons and scallions as well as Hoisin sauce which was spread onto the pancakes.

Fancy having your own 'Home-style' Peking Duck? Why not make your own mandarin pancakes and have a takeaway roast duck from your favourite restaurant. Carve out the meat together with the skin, and wrap with the pancakes.

This is one of the recipes that I've been wanting to try out for a long time. Actually it is not difficult to make, however  it is quite challenging for me to get really round pancakes. I tried out two methods in cooking the pancakes - steamed and pan fried. The steaming method took longer time compared to pan fried as you have to steam one pancake at a time.  


Ingredients:  Makes 32 pancakes 

240g plain flour
10g tapioca starch
1/2 tsp sea salt
160g boiling water
extra tapioca flour or cornflour for dusting

Note: *  Tapioca starch is added for chewiness.  

  • Dissolve salt in the boiling water and pour into the flour mixture.
  • Stir with a pair of chopsticks until the dough comes together.  When the dough is cool enough to handle,  knead until it forms a smooth ball. 

  • Place the dough in a plastic bag and tie it.  Allow the dough to rest at room temperature for about 30 minutes.  It should be smooth, soft and pliable after being rested.
  • Dust your working surface with tapioca starch and roll the dough into a log and cut into 32 equal pieces.  
  • Dusting with tapioca starch, roll each piece of dough into a ball.  
  • Then flatten the balls with your palm into small discs (about 4cm in diameter).

METHOD 1:  STEAMED 

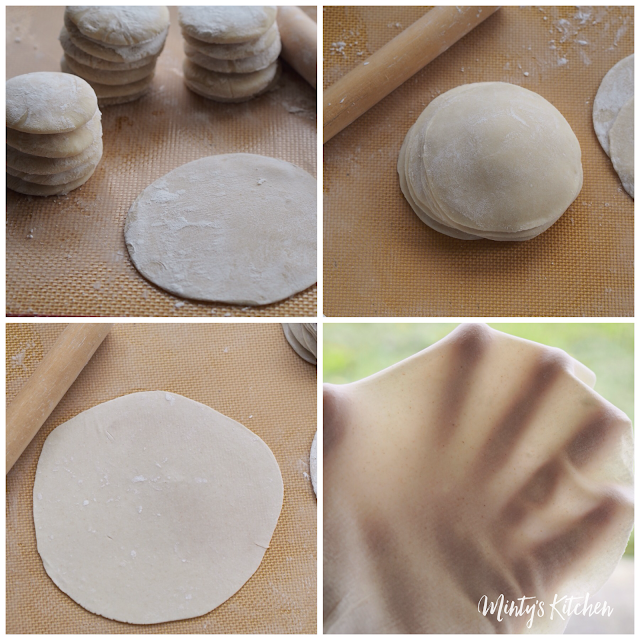
  • Using a rolling pin roll out the discs in circles.  Dust with tapioca starch and stack them up.
  • Meanwhile prepare the steamer, place a plate on the steamer rack.
  • Working with one pancake at a time, roll it into paper thin circle of about 16cm in diameter.


  • Place one pancake at a time onto the plate, cover and steam for 1 minute until the pancake is almost cooked.  While the first pancake is steaming, roll another piece of pancake.  Place the second pancake on top of the first one.  Continue to steam for 1 minute before placing the next piece.  Repeat the process until all the pancakes are done.       
    (TIP:  To easy transfer the thin pancake, roll the pancake onto the rolling pin, then unfurl it onto the steamed pancake)
  • Once all the pancakes are cooked, separate them so that they do not stick to each other.  Then stack them onto a plate and cover with clingwrap to prevent from drying out.

METHOD 2:  PAN FRIED 

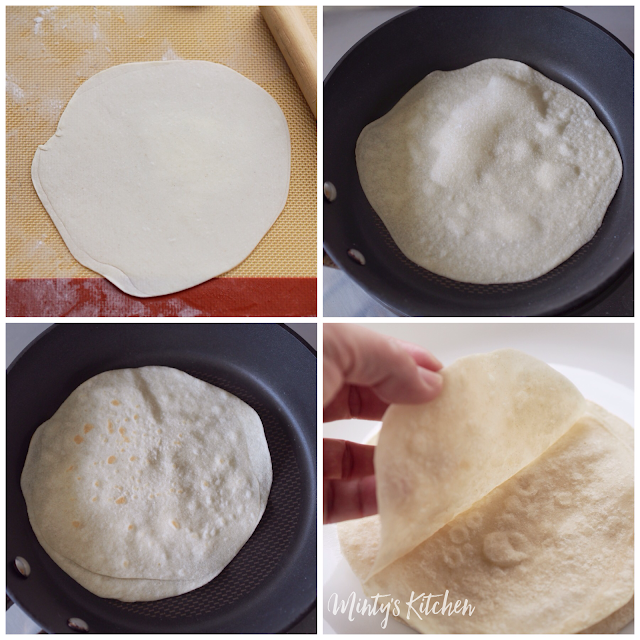
  • Brush sesame oil (or cooking oil) onto the top of one disc, ensuring the sides and the entire surface are coated with oil.  Press another disc over it to form a two-layer pancake.


  • Using a rolling pin, roll the double pancake thinly into large circle of about 16cm in diameter.  Dust the working surface with more flour to prevent sticking.
  • Heat a frying pan over medium-low fire.  Place a pancake into the pan and fry until you see some air pockets forming in between the two pancakes.  
  • Flip the pancake and fry for about half a minute. The pancake should be white with just some light brown spots. 
  • Transfer the pancakes onto a plate.  Carefully separate the two pancakes at the seams while they are still warm.  Cover the pancakes with a damp kitchen towel to prevent from drying out.  


TO REHEAT THE PANCAKES BEFORE SERVING:
  • Place the pancakes onto a bamboo steaming rack and steam for about 3 - 5 minutes.  Serve immediately.
.

Monday, October 2, 2017

No-Bake Lychee Mini Cheesecake

cheesecake


Crust:
150g Marie biscuits
85g butter, melted

Filling:
250g cream cheese, softened
145g caster sugar
250g pureed lychee (blend 150g canned lychee + syrup)
1/2 tbsp lime juice
5-1/2 gelatin sheets
40g lychee syrup
250g thickened cream (chilled)
extra lychee, chopped coarsely
  • Process biscuits in a food processor.  Add in melted butter and mix to combine.
  • Press biscuits into individual dessert mould and using a glass, firmly press down the crust to compact it.  Refrigerate while preparing the filling.
  • Beat chilled cream until soft peaks form.  Set aside in the fridge.
  • Place gelatin sheets into a bowl of cold water for about 10 minutes to soften them. Meanwhile gently heat up the lychee syrup. Squeeze out excess water from the gelatin sheets; then add into the warmed lychee syrup and stir gently until it dissolves.  Set aside.
  • Blend the lychee and enough syrup to get 250g of lychee puree.  Add in lime juice and gelatin mixture and blend to combine.
  • Beat softened cream cheese with caster sugar until smooth and creamy.  Gradually add in lychee puree and beat to combine.   
  • Lastly fold in whipped cream and chopped lychee.
  • Spoon the mixture into crusts and cover with plastic wrap.  Chill for at least 4 hours or overnight.  
Note:  If you are using gelatin powder, dissolve  15g gelatin powder in 40g lychee syrup

Loose base pan

Wednesday, September 27, 2017

Homemade Dumpling Wrappers

Dumplings, Gyoza
Homemade Dumpling, gyoza, jiaozi

To make about 380g of dumpling dough which yields 20 pieces of wrappers, you will need:

150g plain flour
75g bread flour (or substitute with plain flour)
15g wheat starch
1/2 tsp sea salt
150g just boiled hot water
extra wheat starch for dusting

  • Combine flours with salt, then add in hot water.  Using a spatula mix to combine.  When it is cool enough to handle, knead by hand until it all comes together and formed a dough.
  • Place the ball of dough into a plastic bag and let it rest for about 20 - 30 minutes.  The dough should be softer after resting.  Knead the dough again until it is smooth and elastic.  
  • Divide the dough into 2 portions, working with one portion and leaving the other in the plastic bag to prevent it from drying out.

  • Dust your cutting board with flour and roll the dough into a log.  Cut into 10 equal pieces and dust with flour so that they will not stick together.  
  • With your palm, press each piece of dough into a round disc.  
  • To roll out the wrapper, rotate it while moving the rolling pin. Keep on rolling and rotating until the wrappers are thinner at the edges but thicker in the  centre.  Repeat the process with the other portion of the dough.


Saturday, September 2, 2017

Honey-Citron Sponge Cake

Sponge Cake
.... with cheese slices
... with cheese slices


This Honey-Citron Cake is really moist, super soft and fluffy with a fine airy texture. I love the subtle fragrance of the citron and the cake tasted so much better the next day as the flavour of the citron is more pronounced.

Recipe adapted from Jeannie's Taiwan Old Fashion Sponge Cake recipe.   

(A)  Size of eggs: 60-65g each (with shell)
5 egg whites
1/4 tsp cream of tartar
40g caster sugar

(B)  
5 egg yolks 
1 whole egg
1/2 tsp vanilla extract
20g caster sugar
50g rice bran oil (or mild flavoured oil)
70g Honey-Citron marmalade with citrus peels
1 tsp lemon juice (optional)

(C)
60g plain flour
10g corn flour

  1. Preheat oven to 160°C.  Wrap the bottom of a 7" square pan with two layers of aluminium foil to avoid any water from seeping into the pan.  Lightly grease and line the base of the pan with baking paper.
  2. In a clean dry bowl, whisk the egg whites with an electric beater until foamy. Add in cream of tartar.  Continue whisking until soft peaks formed; gradually add in sugar.  Whisk until medium -stiff peaks formed (the tip of the peaks are stiff enough to stand up firmly but with a slight curl at the tip - refer picture below).  Set aside.
  3. In another bowl, with the same electric beater (unwashed) beat egg yolks, whole egg, vanilla extract and sugar until pale. Then beat in oil, Honey-Citron marmalade and lemon juice until blended.  Sift in flour mixture and whisk until well combined.
  4. Fold 1/3 portion of the meringue into the egg yolk mixture to lighten the batter.  Then pour the batter into the meringue and fold gently until thoroughly blended and smooth.
  5. Pour the cake batter into the prepared pan.  Tap the pan against the kitchen bench to remove large bubbles trapped inside the batter.
  6. Sit the cake pan in a larger pan and pour about an inch of boiling water into the larger pan. Bake (on lowest rack) for 20 minutes at 160°C; then reduce temperature to 150°C and continue to bake for 1 hour 15 minutes.  [Please note that every oven is different, therefore oven temperature and baking time indicated here are as a guide only]
  7. Remove from oven and drop the pan from a height a couple of times to minimise shrinkage of the cake.  Unmould the cake and place it on a wire rack to cool.  Allow the cake to be completely cool before cutting.

Note:  If you prefer cheese slices in the cake, in step 5:
  • Pour half of the cake batter into the prepared pan, then place cheese slices gently on top.  Top up with remaining batter. 

meringue at medium-stiff peaks


Thursday, August 31, 2017

Spicy Roasted Chicken Thighs


5 chicken thighs

Marinade:
2 tbsp Sriracha chilli sauce
2 tbsp mirin (optional)
2 tbsp grated palm sugar
2 tbsp light soy sauce
3 tbsp fish sauce
1 tbsp minced garlic
1/2 tbsp grated ginger
freshly cracked black pepper
juice of 1/2 a lemon

  • Combine all the ingredients in a freezer bag.  Add in chicken thighs and turn to coat evenly in the marinade.
  • Marinate for at least 2 hours.
  • Preheat oven to 190°C.
  • Place the marinated chicken thighs on a tray and pour marinade over it.  Bake for about 35  - 40 minutes. 
  • Serve hot with rice.


    Friday, August 4, 2017

    Palm Sugar Banana Cake

     Banana Cake


    I usually prefer Banana Sponge Cake which is lighter but when I fancy a banana cake made with butter, this is my go-to recipe by Ellena Guan of Cuisine Paradise.  The freshly baked cake smells heavenly with the aroma of the palm sugar (gula Melaka); and the cake is so moist and good!

    I halved Ellena's recipe and used a small loaf pan for it.  

    Ingredients: 

    125g butter, softened
    70g shaved palm sugar (gula Melaka) + extra for toppings
    1/4 tsp vanilla extract
    2 eggs (55g each)
    135g self-raising flour
    1/8 tsp baking soda
    1/8 tsp sea salt
    120g bananas, mashed
    30g chopped toasted walnuts
    1 tbsp Cointreau (orange flavoured liqueur)
    a few slices of banana for topping
    • Preheat oven to 170°C.  Line a (21 x 11 x 3.5 cm) loaf pan with baking paper.
    • Sift flour, baking soda and salt together. Set aside.
    • Beat butter and shaved palm sugar until light and fluffy.
    • Beat in eggs, one at a time until well mixed.  Add in vanilla extract.
    • Fold in half of the sifted flours and mix until well combined.  Then add in mashed bananas and mix to combine.  Add in the rest of the flours and mix well.
    • Lastly add in liqueur and chopped walnuts; mix to combine.
    • Pour batter into the prepared pan.  Top with sliced banana, walnuts and shaved palm sugar.
    • Bake for about 45 mins or until a skewer inserted into the middle of the cake comes out clean.
    • Cool the cake in the pan for 10 mins then transfer to a wire rack to cool completely.


    Sunday, July 30, 2017

    Chocolate Butter Cake


    Ingredients:

    180g butter, softened at room temperature
    120g caster sugar, divided
    160g self-raising flour
    4 large eggs, separate
    150g 70% dark chocolate, chopped
    90g fresh milk
    90g hot water + 2 tbsp instant coffee granules

    • Preheat oven to 160°C.  Line the base of a 20cm round pan.
    • Place chocolate in a bowl over a small saucepan of simmering water, ensuring the bowl doesn't touch the water.  Stir occasionally until chocolate is melted and smooth.  Remove bowl from the heat and set aside.
    • In a clean, oil-free mixing bowl, beat egg whites using an electric mixer until soft peaks formed.  Gradually beat in half the sugar until stiff peaks formed.  Set aside.
    • Using the same beaters, cream butter and remaining sugar until light and pale in colour.
    • Gradually add in egg yolks, one at a time, beating well after each addition.  Add in melted chocolate and mix until combined.
    • Add in sifted flour and milk mixture in 3 additions, starting and ending with flour.  Combine until just incorporated.
    • Finally, fold in beaten egg whites in 3 additions, ensuring the batter is well mixed.
    • Scrape the batter into the prepared pan and smooth the top with the spatula.
    • Bake at 160°C for about 1 hour or until a skewer inserted into the centre of the cake comes out clean.
    • Stand the cake in the pan for 10 minutes before turning out onto a wire rack to cool.

    Wednesday, July 26, 2017

    Pineapple Butter Cake


    Ingredients:

    (A)
    4 egg whites, bring to room temperature
    40g caster sugar

    (B)  Lightly beat:
    180g butter, softened at room temperature
    50g caster sugar

    (C)  Sift together:
    4 egg yolks, bring to room temperature
    1/2 tsp vanilla extract

    (D)  Sift together:
    180g self-raising flour
    20g milk powder

    (E) Mixed together:
    45g pineapple juice 
    10g condensed milk
    3 tbsp (canned) crushed pineapple, drained

    • Preheat oven to 160°C.  Line a 21 x 11 x 6 cm loaf pan with baking paper.
    • In a clean, oil-free mixing bowl, beat egg whites using an electric mixer until soft peaks formed.  Gradually beat in sugar until stiff peaks formed.  Set aside.
    • Using the same beaters, cream butter and sugar until light and pale in colour.
    • Gradually add in egg yolk mixture, a little at a time, beating well after each addition. (Remember to scrape down the sides of the bowl).
    • Add in sifted flour and milk powder (D) and coconut milk mixture (E) in 3 additions, starting and ending with flour mixture. Combine until just incorporated.
    • Finally, fold in beaten egg whites in 3 additions, ensuring the batter is well mixed.
    • Scrape the batter into the prepared pan and smooth the top with the spatula.
    • Bake for 30 mins at 160°C, then increase temperature to 170° and bake for a further 20 minutes or until a skewer inserted into the centre of the cake comes out clean.
    • Stand the cake in the pan for 10 minutes before turning out onto a wire rack to cool.
    • Serve warm.


    Thursday, July 13, 2017

    Braised Beef Brisket (炆牛腩)

    Beef Stew


    Ingredients:

    500g beef brisket, cut into big chunks
    450g daikon, peeled and cut into chunks
    40g ginger, minced
    20g garlic, sliced
    2 scallion, sliced
    5g dried mandarin peel
    2 dried chillies, softened, cut in halves
    1 whole star anise

    1 tbsp oil
    2 cups water

    Sauce:
    1 tbsp Chu Hou paste
    2 tbsp Chinese cooking wine
    1 tbsp light soy sauce
    1/2 tsp brown sugar
    1 tsp black pepper powder
    salt, to taste

    • In hot frying pan, brown the beef brisket over moderately high heat.  Transfer onto a plate.  
    • Add oil into the pan and stir fry ginger, garlic, mandarin peel, star anise and dried chillies until aromatic.  
    • Add in sauce and beef; stir well to combine.  Then add in water and daikon; bring to the boil and then reduce fire and simmer until beef is tender.
    • Serve hot with rice or noodles.


    Thursday, June 29, 2017

    Mandarin Butter Cake


    Ingredients:

    (A)
    180g butter, softened at room temperature
    50g caster sugar

    (B)  Lightly beat:
    3 egg yolks (48g), bring to room temperature
    1/2 tsp vanilla extract
    2 tbsp finely chopped mandarin peel (remove the white pith before chopping)

    (C)  Sift together:
    180g self-raising flour
    20g milk powder

    (D)  Mix together:
    45g mandarin juice
    10g honey

    (E)
    3 egg whites, bring to room temperature
    50g caster sugar
    • Preheat oven to 160°C.  Line a 21 x 11 x 6 cm loaf pan with baking paper.
    • In a clean, oil-free mixing bowl, beat egg whites using an electric mixer until soft peaks formed.  Gradually beat in sugar until stiff peaks formed.  Set aside.
    • Using the same beaters, cream butter and sugar until light and pale in colour.
    • Gradually add in egg yolk mixture, a little at a time, beating well after each addition. (Remember to scrape down the sides of the bowl).
    • Add in flour and mandarin juice mixture in 3 additions, starting and ending with flour. Combine until just incorporated.
    • Finally, fold in beaten egg whites in 3 additions, ensuring the batter is well mixed.
    • Scrape the batter into the prepared pan and smooth the top with the spatula.
    • Bake for 30 mins at 160°C, then increase temperature to 170° and bake for a further 20 minutes or until a skewer inserted into the centre of the cake comes out clean.
    • Stand the cake in the pan for 10 minutes before turning out onto a wire rack to cool.
    • Serve warm.


    Thursday, June 15, 2017

    Pan-fried Ricotta Dumplings in Tomato Sauce

    Pan-fried Ricotta gnocchi in Tomato Sauce

    Ricotta Gnocchi
    Ricotta Gnocchi

    Recipe from Two Greedy Italians

    For the dumplings:
    200g high protein flour, plus extra for dusting
    220g ricotta
    3 egg yolks
    25g parmesan, fresh grated
    a pinch of grated nutmeg
    a pinch of salt
    freshly ground black pepper

    For the sauce:
    1 large onion, diced
    3 cloves garlic, minced
    1 chilli, sliced
    2 x 400g canned tomatoes (whole or diced)
    a handful of basil leaves


    • In a large mixing bowl, mix all the dumpling ingredients together to form a soft and moist dough.  
    • Tip the dough out onto a floured work surface and knead for about 5 minutes.  Roll dough into a long thin sausage shape, then cut the dumplings into 2cm pieces.
    • Bring a pot of lightly salted water to the boil and cook the dumplings until they float to the surface.  Transfer the dumplings onto a plate.
    • Heat a little olive oil in a frying pan and place the dumplings in a single layer and fry until dumplings are lightly browned on each side.
    • Meanwhile to cook the sauce, heat olive oil in a pan and stir fry the onion and garlic until soft.  Add in chilli and fry for a minute.  Add in tomatoes and basil. Bring to the boil and let simmer for about 5 minutes.  Season with salt and freshly ground pepper.
    • Toss the pan fried dumplings into the tomato sauce and sprinkle over some grated parmesan before serving.

    Monday, June 12, 2017

    Wholemeal Oats & Seeds Breakfast Cookies

    cookies


    Grab-and-Go the healthy way!  If you are those who always skip breakfast because you don't have the time in the morning, these super easy and healthy cookies which are packed with wholesome and nutritious ingredients is the perfect grab-and-go breakfast. This is a very quick and easy cookie recipe which you can substitute with any healthy ingredients you like to change the type of cookie. No rolling or cutting is required and you can whip up a batch of fresh cookies in no time at all.  What you need is a mixing bowl and a spatula.  

    (A)
    75g organic coconut oil
    1 tbsp organic honey

    (B)
    70g wholemeal self-raising flour 
    1/4 tsp soda bicarbonate
    40g grated palm sugar
    pinch of sea salt
    zest of 1 lemon (optional)
    10g brown flax seed meal
    15g almond meal
    20g chia seeds
    55g rolled oats
    15g desiccated or shredded coconut
    10g raisins (or any dry fruits)
    25g mixed of pumpkin kernels & sunflower seeds

    • Preheat oven to 170°C.  Line a baking tray with baking paper.
    • Over medium-low fire, heat up coconut milk and honey.  Stir to combine. Allow to cool.
    • Sift flour and soda bicarbonate together (throw back the husk into the flour mixture).  Add in the rest of the dry ingredients and stir to combine.  Pour in the coconut oil & honey mixture and stir well to combine into a crumbly mixture.
    • Shape mixture into balls and gently flatten them. Place cookies 2cm apart onto the prepared tray.
    • Bake cookies for about 15-17 minutes or until golden.  Allow to cool completely on a wire rack before storing in an air-tight container.

    Friday, May 19, 2017

    Brown Flaxseed Bread

    Chia & Brown Flaxseed Bread
    Chia & Brown Flaxseed Bread


    This is basically a white bread recipe enriched with some brown flaxseed meal which imparts a beautiful colour to the bread and also gives a nutty and earthy flavour.   Flax is a natural superfood, packed with healthy nutrients and antioxidants. If you can't find flaxseed meal, you can make your own by grinding whole flaxseed using a coffee grinder or blender.


    Tangzhong Starter: 
    40g bread flour
    200g water

    • In a small pan, combine flour and water.  Cook over low heat, stirring continuously until the mixture thickens and you'd notice some "lines" appear in the mixture when you stir (or until it reaches 65°C).
    • Remove from heat and transfer to a clean bowl. Place cling wrap directly onto the surface of tangzhong to prevent from drying up.  Cool or bring to room temperature before using. Measure the amount of tangzhong you required and the rest can be kept in the refrigerator.  But remember, once the tangzhong turns grey, discard it.

    Main Dough:  
    (A)
    250g bread flour
    20g brown flaxseed meal
    10g chia seeds
    15g caster sugar
    3g sea salt
    15g milk powder (optional)
    5g instant dried yeast

    (B)
    100g tangzhong

    (C) Whisk together: (Total liquid=170g)
    55g egg (lightly beaten)
    30g honey/condensed milk
    85g fresh milk (adjust the quantity of milk to make up to 170g in total)

    (D)
    30g coconut oil

    • Combine all ingredients (A) in a mixing bowl.  Add in (B) followed by (C).   Knead until well combined and smooth.  Then add in (D) and continue kneading until dough is smooth and elastic and passed the "window pane test".
    • Place the dough in a lightly greased bowl.  Cover with a damp cloth and let it rise until doubled.
    • Punch down the dough to release trapped air.  Cover and let it rest for 10 minutes.
    • Flatten the dough and roll it up tightly.  Place onto a greased pullman tin (20.5 x 10.5 x 9 cm).  Cover and let it rise until almost doubled (90%).
    • Preheat oven to 170°C.
    • Bake for about 45 minutes or till golden brown.


    Monday, May 15, 2017

    Meyer Lemon Tartlet


    Adapted from Pierre Hermé  - Meyer Lemon Tart recipe

    150g unsalted butter, cubed
    60g caster sugar
    30g almond meal
    1/2 tsp vanilla extract
    1 egg, room temperature
    250g plain flour
    1/2 tsp salt

    • Place flour, almond meal, sugar and butter into a large mixing bowl.  Rub the butter into the flour mixture with your fingertips until mixture resembles fine breadcrumbs.  Add in egg and mix until the dough binds together.  Knead the dough gently into a ball and wrap it in clingfilm. Refrigerate the dough for about 1 hour or overnight.
    • Remove dough from the fridge.  Take a small amount of dough and press down gently with your fingers so that the dough is centred in the well. Prick the bottom of the crust with a fork.  Rest in the fridge for 1 - 2 hours.
    • Bake tart shells in 180°C fan-forced oven for 10 minutes.  Remove from oven and place on a wire rack to cool. After tart shells are cooled slightly, remove them from the moulds and cool completely before use.

    Lemon Cream

    2 eggs (100g without shells)
    120g caster sugar
    70g fresh Meyer lemon juice 
    zest of 2 lemons
    120g unsalted butter, room temperature, cubed

    • In a large metal bowl, rub lemon zest with sugar until sugar is moistened and aromatic. Then add in eggs and lemon juice.
    • Bring a small saucepan holding a couple of inches of water to a simmer over very low heat. Place the metal bowl on top of the saucepan (ensuring that the bottom of the bowl does not touch the water) and whisk the mixture constantly until thickens and reaches 85°C (at this stage your whisk should leave a trail through the cream).
    • Strain the cream and let it cool to about 60°C.  Pour into a blender or use a stick blender to beat in the butter, a few cubes at a time until well blended.  Continue beating for another 2 - 3 minutes to achieve an airy and light cream.
    • Transfer cream into a container and press a piece of cling wrap on the surface of the cream.  Leave the cream to cool at least 4 hours or overnight in the fridge before using.  Just whisk the cream to loosen it before filling the tart shell.

    Tuesday, May 9, 2017

    Hong Shao Rou (红烧肉) or Red Braised Pork Belly


    Ingredients:

    1 kg pork belly
    90g rock sugar (or brown sugar)
    35g ginger, sliced
    dried chillies, cut into halves and soaked in hot water to soften
    4 stalks spring onion, cut into 2cm length
    2.5 cup water, approx
    1 tsp cooking oil
    dash of white pepper

    Sauce:
    4 tbsp Chinese cooking wine
    4 tbsp light soy sauce
    2 tbsp dark soy sauce

    • Cut pork belly into big chunks.  Boil water in a wok and blanch the pork for about 4 minutes.  Drain and set aside.


    • Heat wok and pour in 1 tsp cooking oil; fry pork until caramelised.  Transfer pork into another pot.

    • With the remaining oil in the wok, stir fry ginger slices, dried chillies and spring onion until fragrant.  Add to the pork.

    • Put the rock sugar into the same work and stir fry until all the sugar melts and large bubbles appear.  Add in 1/4 cup water and continue stirring.  
    • Add in pork and ginger slices, dried chillies and spring onion.  Stir to combine.  Pour in sauce and bring to the boil.


    • Transfer everything into the pot.  Add in enough water to cover the pork. Bring to the boil and then lower the fire and simmer for about 1.5 hour with the lid on. Occasionally stir to prevent burning.  
    • Once the pork is tender, uncover the pot.  Cook under medium fire until the sauce thickens.  
    • Garnish with chopped spring onion before serving.


    Related Posts Plugin for WordPress, Blogger...